Lunch boxes have a habit of spreading across the kitchen. A bento container ends up in one cabinet, its matching lid disappears into another, and an insulated lunch bag sits on the counter because nobody knows where it belongs.
Good kitchen lunch box storage ideas solve more than cabinet clutter. They make everyday lunch packing quicker, give clean containers room to dry, and help everyone find the supplies they need before leaving home.
Whether you pack one work lunch or several school lunches, these nine practical storage ideas can help create a tidy system without buying an entire collection of organizers.
Table of Contents
- Before Organizing Lunch Boxes
- 9 Kitchen Lunch Box Storage Ideas
- Which Storage Method Works Best?
- Lunch Box Storage in Small Kitchens
- A Simple Lunch-Packing Routine
- Cleaning and Food Safety
- Common Storage Mistakes
- Frequently Asked Questions
- Final Thoughts
Before Organizing Lunch Boxes
Take all lunch-related supplies out of their current storage locations. Include reusable lunch boxes, bento containers, matching lids, insulated bags, small food jars, reusable utensils, and ice packs.
Sort them into four groups: everyday lunch boxes, occasional containers, insulated bags, and accessories. Match every container with its correct lid. If a container is damaged, cannot be cleaned properly, or has no usable matching lid, consider whether it still deserves cabinet space.
Measure the interior of the cabinet or drawer you plan to use. Pay attention to shelf height, drawer clearance, and the space required for an insulated bag to stand without being crushed.
Finally, separate clean, dry storage from the place where used lunch boxes are unpacked. This simple distinction helps prevent yesterday’s spills from reaching tomorrow’s clean containers.
9 Practical Kitchen Lunch Box Storage Ideas
1. Create a Dedicated Lunch Box Cabinet
Start by assigning one accessible cabinet section specifically to lunch-packing supplies. Keeping everything together reduces the time spent searching different kitchen cupboards.
Place everyday lunch boxes at the front and occasional containers toward the back. If several people use different boxes, create separate sections or use simple labels.
Do not assume the entire cabinet needs to be dedicated to lunch supplies. One well-organized shelf may be sufficient for a small household.
This approach works particularly well when the cabinet is close to the counter used for packing lunches.
2. Store Bento Boxes in Stable Stacks
Many bento-style lunch boxes have flat, rectangular shapes that stack neatly when their designs are compatible.
Group similar sizes together, placing larger containers below smaller ones. Avoid creating tall, unstable towers that require removing several boxes to reach the one you need.
For containers with multiple compartments or removable inserts, keep the components together so a complete set is easy to assemble.
Some containers stack better with lids removed, while others are designed to nest. Follow the manufacturer’s recommendations and make sure everything is thoroughly dry before storage.
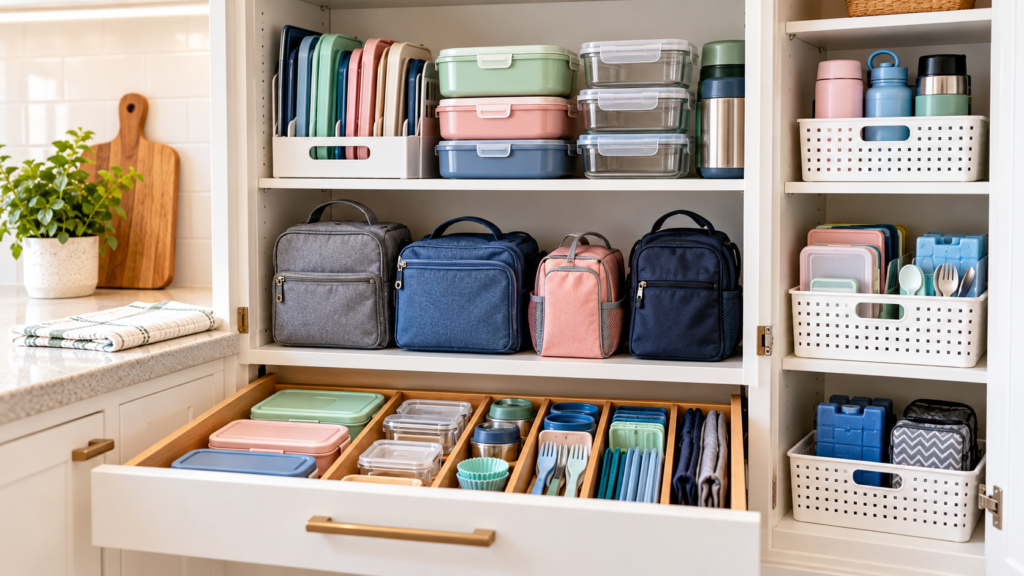
3. Use a Shallow Drawer for Everyday Lunch Boxes
A wide kitchen drawer can be more convenient than a deep cabinet, especially for families who pack lunches every morning.
Arrange lunch boxes in short rows so each one can be lifted out without disturbing the others. Use an adjustable divider if the containers slide around when the drawer opens.
Before committing to this layout, check that the drawer closes smoothly with the tallest container in place. Measure the usable internal height rather than relying on the height of the drawer front.
Keep heavier boxes toward the lower drawers where practical, and avoid exceeding the drawer hardware’s weight limit.
4. Give Lunch Box Lids Their Own Section
Matching lids are one of the biggest frustrations in reusable lunch storage. A small, defined lid zone can make the entire system easier to use.
For flat lids, a low divider or appropriately sized bin may work. Stand lids upright only when they remain stable and their seals will not be damaged.
Keep each lid close to its corresponding container category. If your lunch boxes use several different shapes, avoid mixing every lid into one large basket.
For broader container organization, see our kitchen food container lid organization ideas.
5. Keep Insulated Lunch Bags on a Separate Shelf
Insulated lunch bags need a different storage approach from rigid plastic or stainless-steel containers.
Give them a shelf or open cubby where they can maintain their shape without being compressed by heavy kitchen items. If a bag has a hanging loop and the manufacturer allows it, an appropriate hook may also work for lightweight, empty bags.
After use, empty crumbs and spills, clean according to the care label, and let the interior dry completely before closing and storing it.
Do not place a damp lunch bag into a closed cupboard. Trapped moisture can contribute to unpleasant odors and deterioration.
6. Build a Compact Lunch-Packing Station
A lunch-packing station brings together the items needed to assemble a meal without permanently covering the countertop.
Choose a cabinet or drawer close to your normal preparation area. Store clean lunch boxes, reusable utensils, napkins, and other nonperishable packing accessories nearby.
Refrigerated foods must remain in the refrigerator until packing time. Similarly, reusable ice packs should stay in the freezer until needed.
Instead of leaving all supplies on display, use the countertop temporarily during packing and return the clean accessories to their designated storage spots afterward.
If your kitchen is compact, our small kitchen storage ideas can help you make better use of existing cabinets and work surfaces.
7. Use One Labeled Bin Per Family Member
When several people use different lunch boxes, shared storage can quickly become confusing.
A separate bin for each person’s clean, dry lunch supplies can make morning preparation easier. This is especially helpful when children use differently sized boxes or specific reusable accessories.
Keep labels simple, and choose bins that can be removed easily for cleaning. A bin should hold a practical amount of equipment without becoming so full that items are difficult to retrieve.
For young children, place their supplies at an appropriate height and supervise food preparation as needed.
8. Use Shelf Risers for Short Lunch Containers
Cabinets often waste vertical space when short lunch boxes occupy a tall shelf.
A stable shelf riser can create an additional level for lightweight containers, allowing you to separate everyday boxes from occasional ones.
Check the riser’s dimensions and weight rating before using it. It should sit securely on the cabinet shelf and leave enough clearance to remove items comfortably.
Do not place heavy glass containers on a narrow or unstable riser. A simpler single-level arrangement is better than maximizing space at the expense of safety.
9. Create a Return-and-Dry Zone for Used Lunch Boxes
Storage problems often begin when used lunch boxes are placed directly back into cabinets or left unopened in bags overnight.
Choose a temporary return zone near the sink. When lunch boxes come home, unpack them, discard food waste appropriately, and clean the reusable components.
Allow containers, lids, seals, and insulated bags to dry fully before moving them to clean storage. A drying rack or other suitable washable surface can help keep these items together during the process.
This zone is temporary, not another permanent storage collection. Once everything is clean and dry, return the pieces to their assigned cabinet or drawer.
Which Lunch Box Storage Method Works Best?
Scroll sideways to read the full table.
| Storage Method | Best For | Important Consideration |
|---|---|---|
| Dedicated cabinet shelf | Small or medium lunch box collections | Keep everyday boxes accessible |
| Shallow drawer | Daily reusable containers | Check height and drawer load |
| Labeled bins | Multiple family members | Avoid overfilling |
| Shelf riser | Short, lightweight lunch boxes | Check stability and clearance |
| Open shelf or cubby | Clean, dry insulated lunch bags | Do not store bags damp |
The best solution depends on the number of lunch boxes, the types of containers you own, and the kitchen storage already available. Many households only need a combination of two methods.
Lunch Box Storage Ideas for Small Kitchens
Small kitchens benefit from choosing one primary storage location rather than spreading lunch supplies across multiple cabinets.
Begin with the most accessible cabinet or drawer near your food preparation area. Remove duplicate or unused containers before adding organizers.
Use compatible nesting containers where appropriate, store flat lids in a dedicated section, and consider a shelf riser only when it creates genuinely useful space.
Insulated bags can occupy a separate small shelf or cubby if they do not fit alongside rigid containers. Avoid placing lunch boxes in front of frequently used cooking equipment or blocking access to essential kitchen tools.
If cabinet space is particularly limited, review our kitchen cabinet organization ideas for ways to improve the overall cabinet layout.
A Simple Daily Lunch Box Organization Routine
After Lunch
- Remove leftover food and disposable packaging appropriately.
- Take reusable containers and utensils out of the lunch bag.
- Wash components according to their care instructions.
- Open and clean the insulated bag as required.
- Allow everything to dry completely.
Before the Next School or Work Day
- Choose a clean lunch box from its assigned storage location.
- Find the matching lid and necessary accessories.
- Prepare food using appropriate food-safety practices.
- Keep perishable foods refrigerated until packing.
- Add frozen cold sources to the insulated bag when required.
- Return unused clean supplies to their storage areas.
This routine works because the storage system supports each step rather than requiring a full cabinet search every morning.
Cleaning, Drying, and Food Safety
Organizing lunch boxes should never be confused with safely storing food inside them. Clean, empty lunch containers may be stored in kitchen cabinets, but food that requires refrigeration must be kept at safe temperatures.
According to the USDA Food Safety and Inspection Service guidance on packed lunches, perishable foods transported in an insulated lunch bag should be kept cold using at least two cold sources, such as frozen gel packs or a suitable combination of frozen items. USDA’s lunchbox packing guidance also explains the importance of proper insulated containers for hot foods.
Keep clean, dry lunch boxes separate from dirty returned containers. Inspect reusable seals and closures regularly, and follow the manufacturer’s washing instructions, particularly for insulated materials or components that are not dishwasher-safe.
Storage organizers make equipment easier to find, but they do not replace safe food handling, cleaning, or temperature control.
Common Lunch Box Storage Mistakes
Keeping Too Many Unused Containers
Extra lunch boxes take up valuable cabinet space. Keep enough for your actual routine and reasonable backup needs rather than storing every container indefinitely.
Mixing Lids From Different Sets
Similar-looking lids may not seal correctly. Keep matching components organized and check their fit before packing food.
Storing Insulated Bags While Damp
Close and store lunch bags only after they have been properly cleaned and dried according to their care instructions.
Creating Unstable Stacks
Overly tall stacks can fall or make everyday containers difficult to reach. Choose shorter, stable groups.
Buying Organizers Before Measuring
A bin or riser that looks suitable online may waste space in your actual cabinet. Measure first and buy only what solves a specific problem.
Using the Counter as Permanent Storage
Lunch supplies should return to a cabinet, drawer, or designated shelf after cleaning and packing. This keeps food preparation surfaces more usable.
Frequently Asked Questions
1. What is the best way to organize lunch boxes in kitchen cabinets?
Assign one accessible cabinet shelf to clean lunch boxes, group similar containers, and keep matching lids nearby. Use bins or shelf risers only when they improve visibility and access.
2. Should lunch boxes be stored with lids on or off?
Follow the container manufacturer’s guidance. All parts should be completely clean and dry before storage. Some containers nest more efficiently with lids separated, while others are designed to stack as complete sets.
3. How do I store several kids’ lunch boxes?
Try labeled bins or separate cabinet sections for each child’s clean supplies. Keep the layout simple enough that everyone can find the correct box and accessories.
4. Where should insulated lunch bags be stored?
Store clean, completely dry insulated bags on a suitable shelf, in an open cubby, or another designated location where they are not crushed or exposed to moisture.
5. How can I organize lunch boxes without buying organizers?
Declutter unused containers, match lids, group items by frequency of use, and reserve one cabinet section. Simple arrangements often work without additional purchases.
6. Can lunch boxes be stored in kitchen drawers?
Yes, if the drawer has sufficient internal height, depth, and load capacity. Shallow drawers can make everyday containers easier to see and retrieve.
7. How often should lunch box storage be cleaned?
Wash used food-contact containers after use according to their care instructions. Wipe the storage shelf or bin whenever spills or crumbs appear, and periodically review the collection for damaged or unused items.
Final Thoughts
The most useful kitchen lunch box storage ideas make the daily packing and cleanup routine easier. A dedicated cabinet shelf, simple lid section, properly supported lunch bags, and temporary drying zone can solve many common storage problems without major kitchen changes.
Start with the containers your household uses most often, give them a predictable home, and keep clean storage separate from used lunch supplies. A system that takes only a few seconds to use is much more likely to stay organized over time.