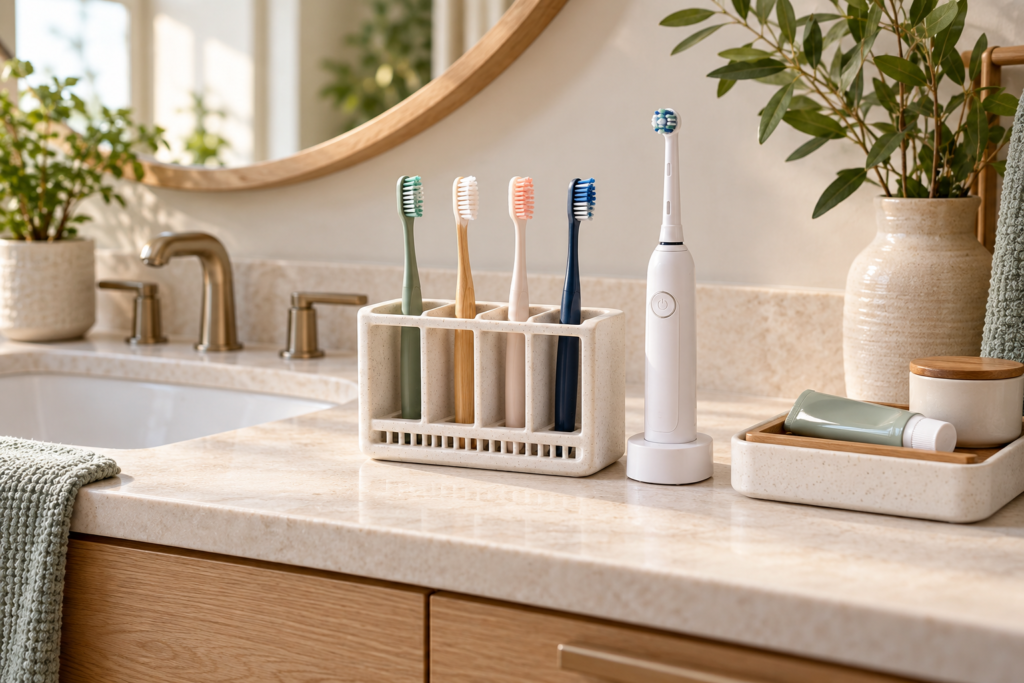
A toothbrush is one of the smallest items in a bathroom, yet storing it properly can be surprisingly difficult. A crowded cup collects residue, a closed drawer can trap moisture, and an electric toothbrush with a loose charging cable can quickly make the counter look untidy.
The best bathroom toothbrush storage ideas do more than hide clutter. They keep each brush upright, allow the bristles to dry, separate household members’ brushes, and make the area easy to clean.
Whether you have a spacious vanity, a narrow sink ledge, or a shared family bathroom, the following ideas will help you create a toothbrush station that is practical, hygienic, and visually calm.
Table of Contents
- The Most Important Toothbrush Storage Rule
- 1. Start With a Ventilated Countertop Holder
- 2. Install a Wall-Mounted Toothbrush Rack
- 3. Use an Adhesive Shelf With Drainage
- 4. Create an Electric Toothbrush Charging Station
- 5. Assign Individual Color-Coded Holders
- 6. Add a Ventilated Medicine Cabinet Rack
- 7. Use a Divided Vanity Organizer
- 8. Install a Recessed Wall Niche
- 9. Choose a Covered Holder With Air Vents
- 10. Use a Dry Drawer for Spare Oral-Care Supplies
- 11. Store Travel Toothbrushes Only When Dry
- 12. Create a Family Oral-Care Zone
- Quick Comparison of Storage Options
- How to Choose the Right Storage Method
- Common Toothbrush Storage Mistakes
- Cleaning and Maintenance Routine
- Frequently Asked Questions
The Most Important Toothbrush Storage Rule
Before choosing a holder, consider airflow.
The American Dental Association recommends rinsing a toothbrush thoroughly after use, storing it upright, and allowing it to air-dry. For an organiser shared by several people, choose separate compartments so each brush remains identifiable and has space to dry. The ADA also explains that routinely storing a moist toothbrush in a closed container can create conditions that encourage microbial growth.
You can review the complete guidance on the American Dental Association toothbrush resource.
Therefore, the most attractive organizer is not necessarily the best choice. Prioritize:
- Adequate ventilation around the bristles
- Drainage beneath wet handles
- Space between individual toothbrushes
- A holder that is easy to remove and clean
- Protection from direct sink splashes
- Enough stability for electric toothbrush handles
1. Start With a Ventilated Countertop Holder
A freestanding countertop holder is the simplest solution when you have adequate vanity space. Choose one with separate openings rather than a single open cup where several brushes lean against each other.
A useful design should have:
- Individual slots for each toothbrush
- A removable drip tray
- A wide, stable base
- Smooth surfaces without deep crevices
- Enough space for air to circulate
Place the holder where it will not be constantly splashed by handwashing. Leaving a small gap between the holder and the wall also makes it easier to wipe the counter.
If the rest of your vanity feels crowded, use these bathroom counter organization ideas to decide which products deserve permanent counter space.
2. Install a Wall-Mounted Toothbrush Rack
A wall-mounted rack clears the vanity and works especially well in small bathrooms. It keeps brushes visible, accessible, and upright without taking away valuable counter space.
Install the rack beside the sink rather than directly above it. This reduces the chance of water collecting underneath the holder or dripping onto items below.
Look for a rack that:
- Holds brushes without squeezing the bristles
- Can be removed for cleaning
- Includes drainage openings
- Supports the weight of electric brush handles if needed
- Uses suitable mounting hardware for the wall surface
Before installing an adhesive model, clean and dry the wall completely. Textured tiles and damp grout lines may not provide a reliable bond, so a screw-mounted organizer may be safer for heavier electric brushes.
3. Use an Adhesive Shelf With Drainage
A compact adhesive shelf can hold toothbrushes, toothpaste, floss, and a small rinsing cup together. It is particularly useful when a pedestal sink or floating vanity provides little storage.
Choose a shelf with an open or slotted base so water cannot pool underneath the toothbrushes. Avoid placing loose brushes flat on the shelf. Add a ventilated divided cup or built-in hanging slots to keep them upright.
Keep only daily essentials on the shelf. Extra toothpaste, replacement heads, and unopened supplies can be stored elsewhere. This keeps the station lighter, cleaner, and easier to maintain.
For more ways to use vertical wall space, see these bathroom shelf ideas for small spaces.
4. Create an Electric Toothbrush Charging Station
Electric toothbrushes need slightly different storage because they have wider handles, removable heads, and charging cables.
Create a dedicated charging station with:
- A stable base for each handle
- Separate ventilated slots for brush heads
- A nearby suitable electrical outlet
- A short cable route that stays away from standing water
- A washable tray beneath the charger
Do not tightly wrap a wet handle or charging base inside a decorative basket. Moisture and toothpaste residue can collect where they are difficult to see.
Wipe the handle before returning it to the charger, and follow the manufacturer’s charging and cleaning instructions. If several people use the same charging base, label or color-code the removable brush heads.
5. Assign Individual Color-Coded Holders
Shared bathrooms become easier to manage when each person has an assigned toothbrush position. Use color-coded rings, labeled slots, or separate small holders.
This system helps prevent:
- Brushes touching one another
- Confusion between similar brush styles
- Children using the wrong toothbrush
- One person taking over the entire holder
- Replacement heads becoming mixed together
Labels should be simple and moisture-resistant. Initials or small colored symbols work better than large decorative labels that are difficult to clean.
For young children, place holders within safe reach while keeping toothpaste and other products according to their age and supervision needs.
6. Add a Ventilated Medicine Cabinet Rack
A medicine cabinet can keep toothbrushes away from visual clutter, but ventilation still matters. Do not place a freshly used brush horizontally inside a sealed container or against other damp items.
A better setup is a small upright rack attached to the inside of the cabinet. Check that:
- The brush can stand without touching the shelf above
- Bristles do not contact the cabinet door
- Air can move around the brush
- The cabinet interior remains dry
- The holder can be removed for cleaning
If your cabinet feels overcrowded, reorganize it before adding another accessory. These medicine cabinet organization ideas can help separate daily oral-care products from first-aid items, skincare, and less frequently used supplies.
7. Use a Divided Vanity Organizer
A divided organizer creates a defined oral-care zone on a wide vanity. One compartment can hold toothbrushes, another can hold toothpaste, and a third can hold floss or interdental cleaning products.
Avoid deep compartments that hide residue at the bottom. A shallow, removable organizer is easier to inspect and wash.
For a more polished appearance, choose a material that matches the bathroom:
- Clear acrylic for a light visual footprint
- Glazed ceramic for a warm, decorative look
- Stainless steel for a modern bathroom
- Durable plastic for children’s bathrooms
- Sealed bamboo for a softer natural style
Whichever material you choose, confirm that it tolerates regular washing and bathroom humidity.
8. Install a Recessed Wall Niche
A recessed niche can provide permanent toothbrush storage without projecting into a narrow bathroom. This works best during a renovation because the niche must be planned around plumbing, waterproofing, and wall structure.
Position the niche where it is easy to reach but not directly exposed to shower spray or frequent sink splashes. Include a removable holder rather than resting toothbrushes directly on the niche surface.
A slight shelf slope or well-designed drainage detail can prevent water from sitting in the recess. Use water-resistant, easy-to-clean finishes and avoid complicated grout patterns around the storage area.
9. Choose a Covered Holder With Air Vents
A covered holder may be useful in a particularly dusty bathroom or when you want to protect bristles from incidental splashes. However, the cover must provide adequate ventilation.
Look for:
- Large ventilation openings
- A cover that does not touch the bristles
- A removable drip tray
- Separate spaces for different brushes
- Components that can be washed thoroughly
A fully sealed cap is better reserved for transporting a dry toothbrush than for daily storage of a damp one. If condensation appears inside a holder, the brush needs more airflow.
10. Use a Dry Drawer for Spare Oral-Care Supplies
Drawers are useful for unopened toothbrushes, replacement electric brush heads, floss refills, and travel cases. They are less suitable for a wet daily toothbrush unless it has completely dried first.
Use small divided bins to separate:
- Unopened manual toothbrushes
- Electric replacement heads
- Dental floss and interdental brushes
- Travel covers
- Spare toothpaste
- Children’s oral-care supplies
Do not overfill the drawer. Supplies should remain visible so older products are used before new ones are purchased.
These bathroom drawer organization ideas provide a practical system for dividing small daily-care products.
11. Store Travel Toothbrushes Only When Dry
Travel covers protect a toothbrush inside a toiletry bag, but they should not become the brush’s permanent bathroom storage.
After returning home:
- Remove the toothbrush from its travel case.
- Rinse the brush thoroughly.
- Allow it to dry upright.
- Wash and dry the case before storing it.
- Leave the case open until no moisture remains.
If a toothbrush must be packed shortly after use, shake off excess water and select a cover with ventilation holes. Unpack it as soon as practical at the destination.
Keep clean travel supplies together in a labeled bathroom bin so they are easy to find without mixing them with daily items.
12. Create a Family Oral-Care Zone
A family bathroom may need storage for several toothbrushes, multiple toothpaste types, floss, electric chargers, and children’s products.
Instead of using one crowded cup, create a complete oral-care zone:
- Give each person an individual toothbrush slot.
- Keep bristles separated.
- Use one tray to contain toothpaste residue.
- Store spare products in a nearby drawer or cabinet.
- Add a small waste bin for used floss and empty packaging.
- Keep the counter arrangement simple enough to clean quickly.
The daily items should remain easy to reach, while refills and occasional-use products can move into closed storage. This reduces clutter without compromising toothbrush airflow.
For a bathroom with very limited cabinetry, combine the system with these small bathroom storage ideas.
Quick Comparison of Toothbrush Storage Options
Scroll sideways to read the full table.
| Storage Option | Best For | Main Advantage | Important Caution |
|---|---|---|---|
| Ventilated countertop holder | Spacious vanities | Simple and portable | Clean the drip tray regularly |
| Wall-mounted rack | Small bathrooms | Saves counter space | Confirm the mounting method |
| Adhesive shelf | Rentals and pedestal sinks | Uses vertical space | Avoid overloading it |
| Charging station | Electric toothbrushes | Controls handles and cables | Keep the base away from pooled water |
| Medicine cabinet rack | Minimal counters | Reduces visible clutter | Ensure ventilation |
| Divided drawer | Spare supplies | Keeps refills organized | Do not enclose a wet brush |
| Covered vented holder | Dust or splash control | Adds limited protection | Avoid sealed damp storage |
| Recessed niche | Renovated bathrooms | Permanent space-saving design | Requires correct waterproofing |
How to Choose the Right Storage Method
How Many People Use the Bathroom?
One person may only need a compact holder. A family needs separated slots, clear ownership, and more frequent cleaning.
Are the Toothbrushes Manual or Electric?
Electric brushes require wider supports, charging access, and cable management. Their removable heads should remain separated and ventilated.
How Much Counter Space Is Available?
If the sink area is narrow, use a wall rack, adhesive shelf, or carefully arranged medicine cabinet. Avoid forcing a large organizer onto a small ledge.
Can the Holder Be Cleaned Easily?
A simple removable holder will usually be more practical than an organizer with decorative crevices. Check whether each component can be washed and dried.
Will the Toothbrush Receive Enough Airflow?
This should be the final deciding factor. If a holder traps visible moisture or keeps bristles pressed together, choose another solution.
Common Toothbrush Storage Mistakes
Keeping Several Brushes in One Crowded Cup
When brushes lean together, the bristles may touch and the bottom of the cup can collect water and toothpaste residue.
Covering a Wet Toothbrush
A sealed cap or container can retain moisture. Allow the brush to air-dry before using a travel cover.
Ignoring the Bottom of the Holder
The visible upper section may appear clean while residue builds up underneath. Choose a holder with a removable base.
Placing the Charger Beside Pooled Water
Keep electrical charging equipment on a dry, stable surface and follow the product manufacturer’s instructions.
Storing Cleaning Chemicals Beside Oral-Care Products
Keep toothbrushes, toothpaste, and replacement heads separate from bathroom cleaners. A dry upper cabinet or dedicated drawer is generally more appropriate for spare oral-care supplies.
Buying an Organizer That Is Too Difficult to Clean
An attractive design becomes inconvenient if the narrow openings cannot be washed. Prioritize removable and accessible components.
A Simple Cleaning and Maintenance Routine
After Each Use
- Rinse the toothbrush thoroughly.
- Shake off excess water.
- Return it upright to its assigned slot.
- Keep the bristles separated from other brushes.
Several Times Each Week
- Wipe visible toothpaste from the holder and counter.
- Check the charging base for residue.
- Empty any standing water from the drip tray.
During Regular Bathroom Cleaning
- Wash the holder according to its material and manufacturer instructions.
- Clean the wall or counter underneath it.
- Allow all components to dry before reassembly.
- Discard damaged containers that can no longer be cleaned properly.
- Review spare supplies and remove empty packaging.
Frequently Asked Questions
Should Toothbrushes Be Stored Inside a Cabinet?
They can be stored in a cabinet if they remain upright, separated, and able to dry. A damp toothbrush should not be placed inside a tightly sealed container.
Is It Safe to Keep Toothbrushes Together?
Different brushes can share one organizer, but their bristles should not touch. A holder with individual separated openings is better than one large cup.
Can I Store My Daily Toothbrush in a Drawer?
A drawer is better for dry spare supplies. If you want to store a daily toothbrush there, allow it to dry completely first and use a clean, ventilated insert.
How Should an Electric Toothbrush Be Stored?
Keep the handle upright on a stable charging base or stand. Store removable brush heads separately, allow airflow, and follow the manufacturer’s cleaning and charging guidance.
Are Toothbrush Covers Suitable for Everyday Use?
Ventilated covers can offer limited protection, but a wet toothbrush should not remain sealed. Covers are most useful for transporting a clean, dry brush.
Where Should Spare Toothbrushes Be Stored?
Keep unopened toothbrushes and replacement heads in a clean, dry cabinet or drawer away from leaks, cleaning products, and standing water.
Final Thoughts
Good toothbrush storage should make healthy daily habits easier. The ideal solution keeps brushes upright, separated, ventilated, and simple to reach while containing drips and reducing counter clutter.
Start with the number and type of toothbrushes in your household. Then choose a holder that fits the available space and can be cleaned without effort. A small, carefully planned oral-care station will usually perform better than a large organizer filled with unnecessary products.
Most importantly, do not sacrifice airflow simply to hide the toothbrushes. A clean, organized bathroom should support both visual calm and practical everyday care.